How to Estimate Project Hours Accurately
 By Suraj Rao11 min read
What You'll Learn
- Estimate from the bottom up: break the project into small tasks, include the work nobody lists, and estimate each task on its own.
- Give each task an optimistic, likely and pessimistic number, and use your own past tracked time to correct the bias most people have toward optimism.
- Compare every estimate with the actual hours when the project ends, and feed the difference into the next quote.

Most project estimates are wrong in the same direction: too low. Not because people can't count, but because they picture the work going smoothly, forget the small jobs around it and have no record of how long the same kind of work took last time.
An accurate estimate isn't a guess made with confidence. It's a method you repeat: break the work down, estimate each piece with a range, check it against what similar work really took, and add a buffer you can explain. Then, when the project ends, you compare the estimate with the actual hours and get a little better.
This guide walks through that method step by step, with a worked example you can copy, a simple formula for three-point estimates and a short review to run after every project.
Why project hour estimates go wrong
Underestimating is so common that psychologists have a name for it: the planning fallacy. In a 1994 study by Buehler, Griffin and Ross, psychology students estimated an average of 33.9 days to finish their senior theses; the average actual time was 55.5 days, and only about 30% finished within their own estimate (Wikipedia: planning fallacy). Douglas Hofstadter summed it up in Gödel, Escher, Bach: it always takes longer than you expect, even when you take that into account (Wikipedia: Hofstadter's law).
Large projects show the same pattern. A McKinsey and University of Oxford study of more than 5,400 IT projects found that large IT projects ran, on average, 45% over budget and 7% over time (McKinsey: delivering large-scale IT projects on time, on budget, and on value).
For freelancers and small teams, the causes are usually familiar:
- Estimating only the "real" work. Calls, feedback rounds, setup and handover don't make the list.
- Picturing the best case. No sick days, no unclear brief, no slow client.
- Anchoring on the budget. The client mentions $5,000 and the estimate quietly lands at $4,800.
- Estimating big chunks. "Build the website: 40 hours" hides a dozen decisions.
- No history. Without tracked time from past projects, every estimate starts from memory.
The method below tackles each of these in turn.
Step 1: Break the project into small tasks
Estimate from the bottom up. List every piece of work the project needs, then estimate each piece separately. Small tasks are easier to picture, and errors on small tasks tend to partly cancel out rather than compound.
A useful rule of thumb: if a task would take more than a day or two, split it. "Design the homepage" becomes "homepage wireframe", "homepage visual design", "homepage revisions". You'll often find work you hadn't thought about while splitting.
Then add the work that sits around the deliverables. Project budgets usually break on the small, constant jobs, not the big ones. Our guide to project budgets has a full list; the short version is:
- kickoff, check-in calls and email;
- revision rounds, counted by number;
- setup: accounts, access, environments, files;
- internal review before anything goes to the client;
- testing, launch and handover.
If you're writing a statement of work, the task list and the scope section should match. Anything the client might expect that isn't on your list is a future argument about scope creep.
Step 2: Estimate each task with three numbers
A single number hides how uncertain you are. A three-point estimate makes it visible. For each task, write down:
- O (optimistic): how long it takes if everything goes right.
- M (most likely): how long it usually takes.
- P (pessimistic): how long it takes if the usual things go wrong, not if disaster strikes.
Then combine them with the PERT formula, developed by the US Navy's Special Projects Office in the late 1950s (Wikipedia: program evaluation and review technique):
Expected hours = (O + 4 x M + P) / 6
Spread (standard deviation) = (P - O) / 6
The formula leans on the most likely number but pulls the estimate toward the pessimistic one when the downside is large. That's exactly where single-number estimates go wrong.
Worked example: a small website redesign
Here's a hypothetical brochure site, estimated task by task:
| Task | O | M | P | Expected (O + 4M + P) / 6 | Spread (P − O) / 6 |
|---|---|---|---|---|---|
| Discovery call and brief | 3 | 4 | 8 | 4.5 | 0.8 |
| Sitemap and wireframes | 6 | 8 | 14 | 8.7 | 1.3 |
| Visual design (5 pages) | 12 | 16 | 26 | 17.0 | 2.3 |
| Two revision rounds | 4 | 6 | 12 | 6.7 | 1.3 |
| Development and CMS setup | 16 | 20 | 34 | 21.7 | 3.0 |
| Content entry | 3 | 4 | 8 | 4.5 | 0.8 |
| Testing and launch | 3 | 4 | 9 | 4.7 | 1.0 |
| Calls, email and project management | 5 | 6 | 10 | 6.5 | 0.8 |
| Total | 52 | 68 | 121 | 74.2 |
A few things to notice:
- The sum of the "most likely" column is 68 hours. The expected total is 74.2. That 6-hour gap is the optimism you'd have quoted without the method.
- The pessimistic column adds up to 121 hours, but that's not your estimate. It's unlikely that every task hits its worst case at once.
- Development has the largest spread. That's the task to clarify with the client before you sign, or to split further.
If you want a rough range for the whole project, a common shortcut is to combine the spreads: square each one, add them up and take the square root. Here that gives about 4.6 hours. Two spreads either side of 74.2 gives a range of roughly 65 to 83 hours, which covers most outcomes. Treat that as a guide, not a guarantee.
Step 3: Check against your own past tracked time
The single best fix for the planning fallacy is your own history. In the same 1994 research, Buehler and colleagues report that the optimistic bias disappeared for participants who were told to connect relevant past experiences to their predictions (Buehler, Griffin and Ross, 1994).
For you, "past experience" means tracked hours from similar projects. Pull the last three to five that look like this one and compare what you estimated with what they really took:
| Past project | Estimated hours | Actual hours | Actual ÷ estimate |
|---|---|---|---|
| Bakery site | 60 | 71 | 1.18 |
| Physio clinic site | 70 | 79 | 1.13 |
| Architect portfolio | 55 | 68 | 1.24 |
| Average | 1.18 |
In this hypothetical history, projects like this take about 18% longer than estimated. That ratio is your correction factor. Before you trust 74 hours, ask whether the new project is easier, harder or the same as the old ones. If it's the same, 74.2 × 1.18 ≈ 88 hours is a more honest number.
Look at task level too, if your tracking allows it. You may find your design estimates are accurate but revisions always run double. That's more useful than one blended ratio, because it tells you which line to change.
If you don't have tracked history yet, start now. Even one project tracked against its tasks gives you a reference point for the next quote. Our guide to time tracking best practices covers the habits that keep that data clean.
Step 4: Add a buffer you can explain
Every estimate needs some room for the unexpected. The trick is to add it once, openly, rather than padding every task in secret.
There are two kinds of buffer:
- Contingency for known risks. "The client hasn't chosen a CMS yet" or "content may arrive late". Estimate each risk's likely cost in hours and add those.
- A general buffer for unknowns. A percentage on top of the total for the things you can't name yet.
How big should the general buffer be? There's no universal number. Use your correction factor from Step 3 as a starting point, and size it to the uncertainty:
| Situation | Typical approach |
|---|---|
| Repeat work for a client you know, clear brief | Small buffer, or rely on the three-point estimate alone |
| New client, familiar type of work | Moderate buffer, based on your past actual ÷ estimate ratio |
| New type of work or unclear requirements | Large buffer, or split into a paid discovery phase first |
The last row matters. When requirements are vague, no amount of estimating fixes it. Offer a small, fixed discovery phase, then estimate the rest once you know what you're building.
Keep the buffer visible in your own working, even if the client only sees a total. When you review the project later, you'll want to know whether the buffer was used and on what.
Step 5: Turn hours into a quote
Once you have an estimate you believe, the quote follows from how you bill:
- Hourly: give the estimate as a range ("75 to 90 hours at $90 an hour, about $6,750 to $8,100") and agree what happens if it looks like going over.
- Fixed price: price from the upper part of your range, because you carry the risk. If the expected cost is 88 hours at $90, quoting $7,920 leaves no margin for anything you missed.
- Retainer: estimate the typical month, then compare it with real monthly hours after the first two or three months.
Our guide to retainers vs fixed-price projects covers the trade-offs, and if your rate itself needs work, start with how to calculate your hourly rate or the hourly rate calculator.
Write the assumptions behind the estimate into your proposal: number of revision rounds, who supplies content, what's out of scope. Assumptions turn "you said 70 hours" into "70 hours assumed two revision rounds; this is the fourth". Our guide on how to write a project proposal shows where they go.
Compare estimates with actuals, during and after
An estimate you never check doesn't make the next one better. There are two moments to compare.
During the project, check weekly whether the hours used match the work done. Our project budgets guide covers burn rate and what to do when a project starts running over, so we won't repeat it here.
After the project, run a short review while it's fresh. This is the step most people skip, and it's the one that improves estimates.
A 15-minute post-project estimate review
Project:
Estimated hours (expected):        Actual hours:
Actual / estimate:

Tasks that ran over by more than 20%:
- Task, estimate, actual, why

Tasks that came in under:
- Task, estimate, actual, why

Work that happened but wasn't on the task list:
-

Was the buffer used? On what?

One change for the next estimate of this kind:
The "work that wasn't on the list" line is the most valuable. Whatever goes there becomes a standard line in your next estimate. To see whether the project made money as well as whether it ran to time, pair this with a project profitability check.
Doing it in Tristiks Grow
In Tristiks Grow, you set an estimated time when you create a project, and the project shows the time tracked against it beside the estimate. Tasks can carry their own time estimates too, so you can plan the work in pieces, and every hour you track on a task lands on the client's timesheet. See project time tracking for how it fits together.
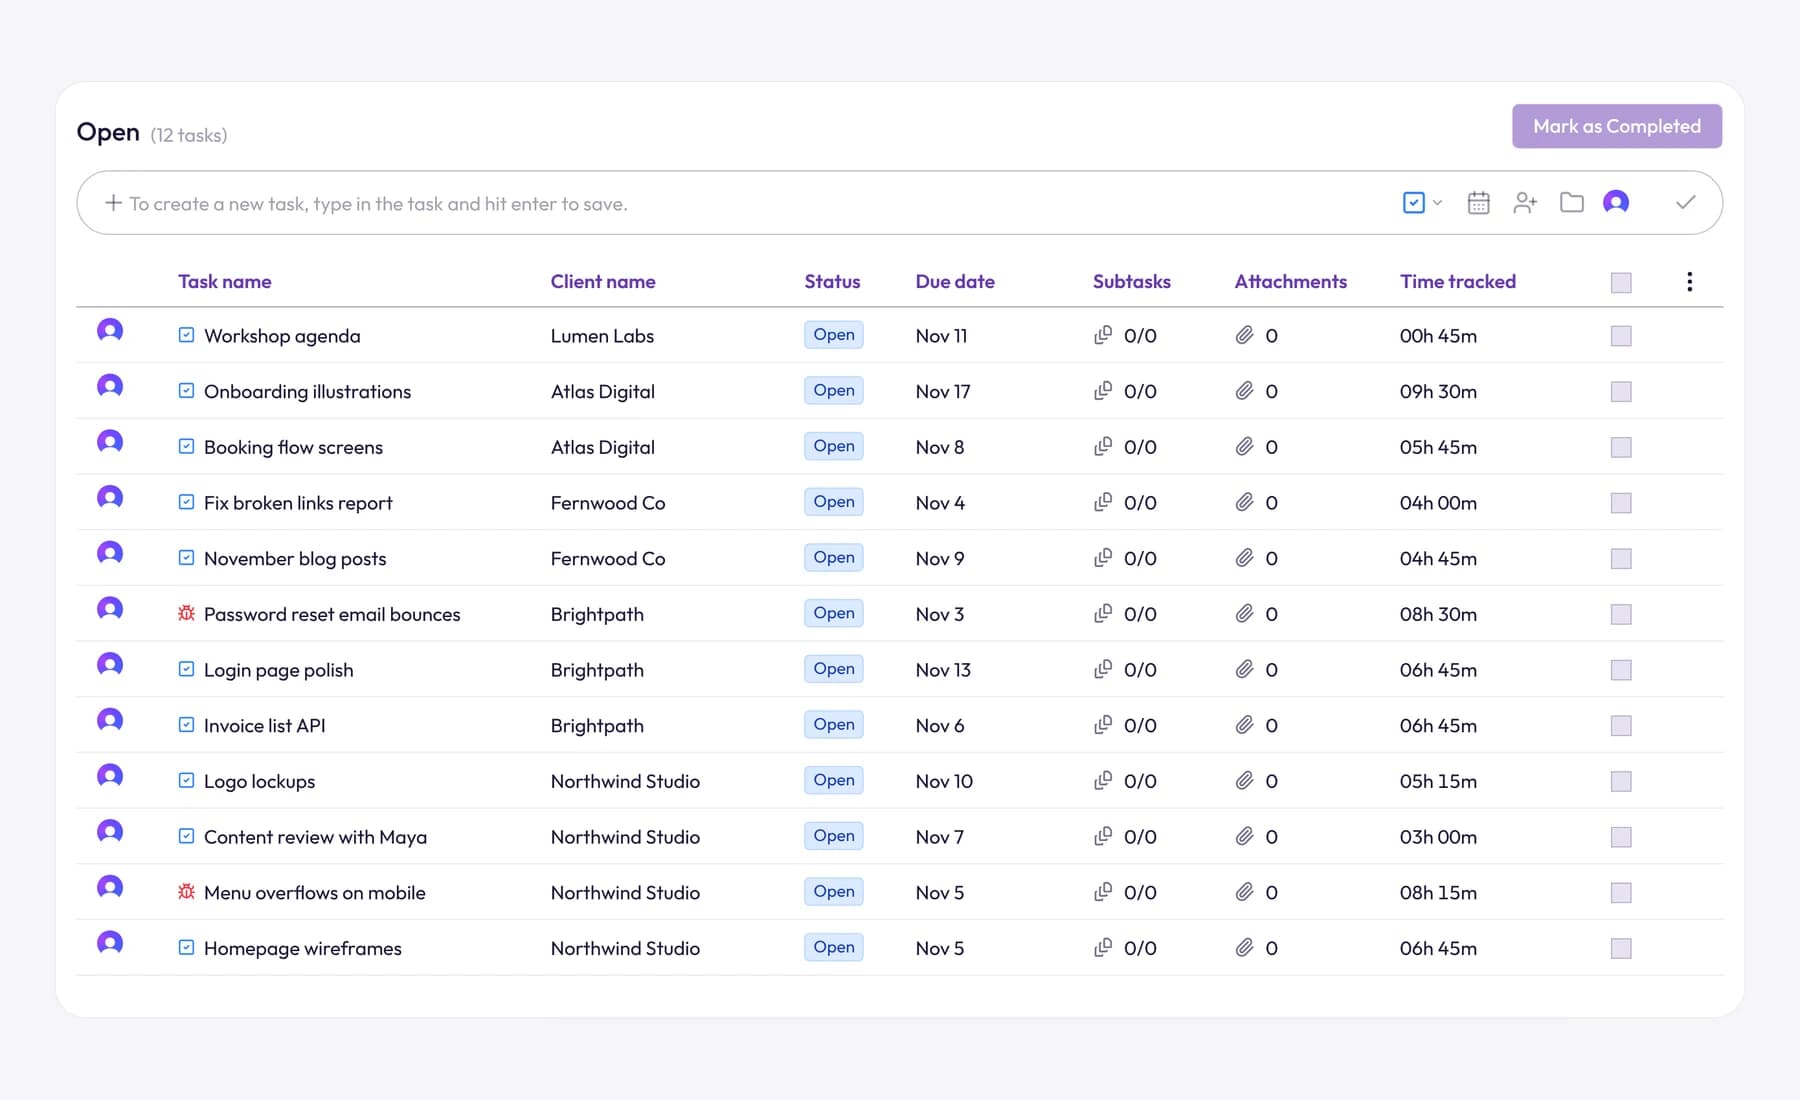
Because the time is tracked against tasks as you work, your next estimate can start from real hours instead of memory. The task management page shows how tasks, due dates and timers work together.
Common estimating mistakes to avoid
- Giving a number on the call. Say "I'll send an estimate tomorrow" and use the method.
- Estimating for someone else. If a teammate will do the work, ask them to estimate it too. They know the details the estimate depends on, and comparing your number with theirs shows where the brief is unclear.
- Hiding the buffer in every task. It disappears into the work and you learn nothing.
- Never re-estimating. When scope changes, the estimate changes. Send a revised one with the change request.
- Treating the estimate as a promise without assumptions. Write down what the number depends on.
- Only counting billable work. Admin on the project is still time the project costs you. For how this affects your overall numbers, see our guide to agency utilization rate.
Frequently asked questions
What is the most accurate way to estimate project hours?
Break the project into small tasks, estimate each one with optimistic, most likely and pessimistic numbers, and combine them with the PERT formula. Then correct the total using how long similar past projects really took, and add a visible buffer for known risks.
How much buffer should I add to a project estimate?
It depends on how uncertain the work is and how your past estimates have compared with actual hours. If similar projects usually run 15% over your estimate, that's a sensible starting point for the buffer. For work with unclear requirements, a paid discovery phase is safer than a large buffer.
What is a three-point estimate?
It's an estimate made from three numbers: optimistic, most likely and pessimistic. The PERT version weights them as (O + 4M + P) ÷ 6, which gives a number slightly above "most likely" when the pessimistic case is far away. It shows both an expected figure and how uncertain the task is.
How do I estimate hours for a type of project I've never done?
Find the closest work you have done, and estimate the unfamiliar parts with wide ranges. Consider splitting the project: quote a small discovery or prototype phase first, track it closely, and estimate the rest from what you learn.
Wrap up
Accurate estimates come from a repeatable method, not from experience alone: break the work down, estimate each piece with a range, check it against your own history, add an honest buffer and review the actuals when you're done. Each project makes the next estimate a little better.
To see estimates and tracked hours side by side on every project, try Tristiks Grow project time tracking free for 14 days.
Category: Time Tracking
Suraj Rao
Suraj Rao is the founder of Tristiks, the team behind Tristiks Grow and its desktop time tracker OneTrack. He writes about time tracking, client work and getting paid, and about DevOps, cloud and AI from years of building software.